Craft Art

834d68a692f927194e7f5463b18bf54a

ATC with Smooshed Background

IMG 0523

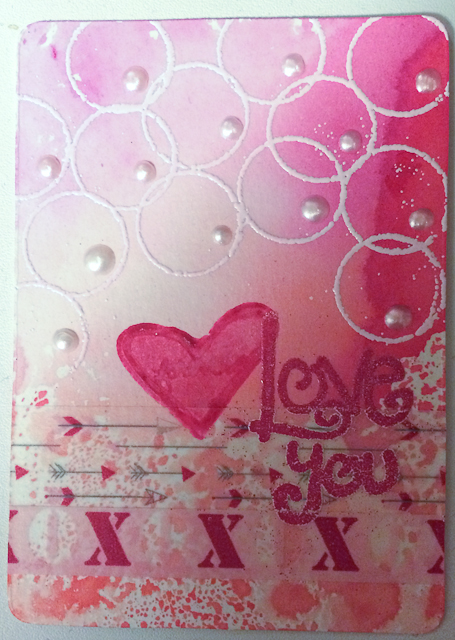
This ATC was done for a Challenge on Artsy Inkers message board.  The technique is called smooshing, you take a acrylic block and put your ink (I used distress ink) onto the acrylic block and then spray with water and stamp onto the ATC.  I used 3 colors of ink and smooshed.  Then I put 2 washi tapes along the bottom, stamped and heat embossed the love you, and stamped the heart with paint.  I then stamped the top of my water sprayer with embossing ink and embossed the circles on the top part of the ATC.  I used a Viva Decor pen in pearl to make the dots inside the circles.  I did not ink the outside of this ATC, I like it the way it is and didn't want anything to take away from the background.

Thank you for looking.

IMG 0524

This ATC was done using blue, pink, and green distress ink and the smoosh technique.  The die cuts are also done using the smoosh technique.  The love stamp and the flowers are from one of those itty bitty stamp sets that used to be a dollar.  I used itty bitty jewels, little enamel hearts, and itty bitty brads.  The dies cuts are from a sizzix set with honey comb and a big bee.

Thank you for looking.

IMG 0525

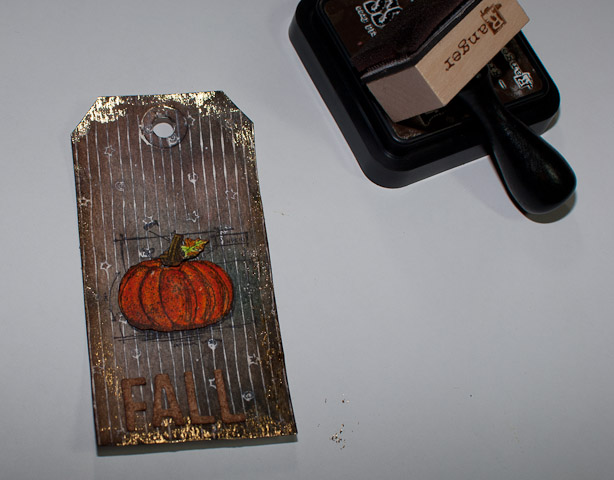
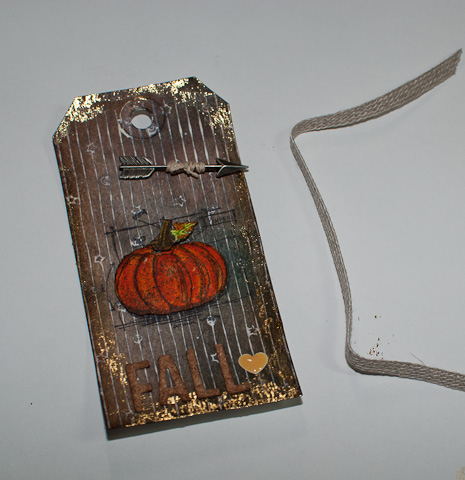
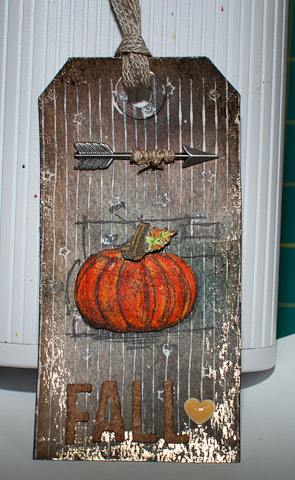
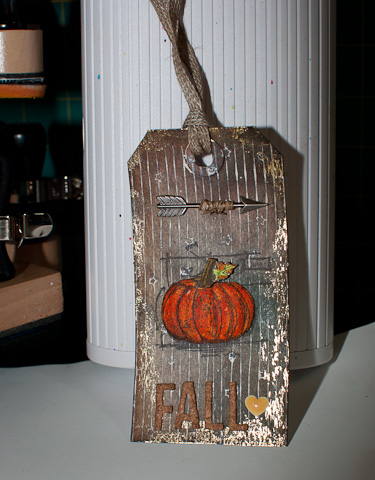
You guessed it another smooshed background on this ATC.  I used a small Paper Artsy stamp and colored it in with Inktense pencils and water activated them.  I stamped the saying and the circles with embossing ink and then used red embossing powder which was then heated.  The heart (which is a requirement for the Challenge) was punched out with a small very old punch and the embossed with the red embossing powder and heated several different times.

Thank you for looking.

IMG 0526

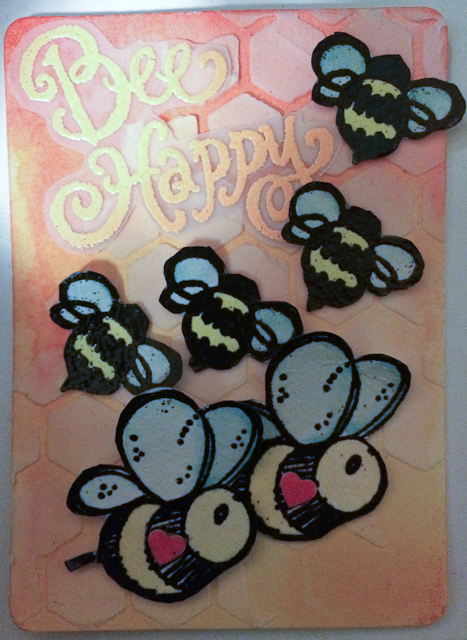
This ATC also has the smooshed technique on the background.  Then I put modeling paste through the Tim Holtz honeycomb stencil.  I stamped and embossed the bees and the Bee Happy sentiment.  The bees are embossed with black embossing powder, the Bee Happy is embossed with an orange embossing powder.  The sentiment is stamped and embossed on vellem and then cut out and glued to the ATC.  The bees are embossed and then colored with distress markers.  The little hearts are punched out of card stock that I inked with a red distress ink.  Part of the bees are glued directly to the ATC and part of them are popped up with foam.

Thank you for looking.

Link to Artsy Inkers Challenge/Swap

My Take on Tim Holtz December 2015 Tag

It's the new month and the last Tim Holtz tag of 2015.  This month was an interesting one.  The amount of product I had did not outweigh the product I didn't have.  So here we go....

Tim Holtz Tag and Instructions.

I cut a tag out of watercolor paper and cut another tag out of DCWV burlap using the Tim Holtz large tag die.  I glued the burlap to the tag using the Ranger collage glue stick.

DSC 0041

I used the Gothic THS026 Tim Holtz stencil instead of the THS032 stencil that Mr. Holtz used.  I also used Dylusions Cherry Pie Spray Ink instead of distress spray ink which I don't own. 

DSC 0042

I used ground espresso to ink the edges of the tag.  I used the Festive Greenery Tim Holtz strip die to cut 3 colors of card stock from the holly leaves and various other small winter greenery.  I also inked the edges of the greenery with ground espresso.

DSC 0046

I glued them on the tag around the circle I drew.

DSC 0048

I then cut the small bow from the bow strip die and cut some flowers from the Tim Holtz tiny tattered floral dies.  I used the same color of cardstock for the bow and the flowers. 

DSC 0049

I attached the bow and the flowers onto the tag.  I used the flowers because I also did not have the jingle bell brads.

DSC 0051

I do not own the distress splatter brush so I used the Tim Holtz marker spritzer and the white picket fence distress marker.  I took the chit chat stickers and distressed the edges with the Tim Holtz sanding block.

DSC 0052

I glued the chit chat stickers using Ranger Glossy Accents.  I then took a star and used Current alcohol ink to color it and also glued it on using Ranger Glossy Accents.  I sewed around the bottom of the tag using my sewing machine.  I then took a piece of dressy ribbon and sprayed it with Dylusions Cherry Pie spray ink.  I dried it and tied it to the top of the tag. 

DSC 0053

Here is the finished tag.  This was fun to make and it makes me sad that this is the last tag for 2015.

DSC 0054


My Take on Tim Holtz November 2015 Tag

winner

Instructions and Tim Holtz Tag

So this month I had some of the product Mr. Holtz used on his tag so I used them.  I started out cutting a tag from the Tim Holtz tag and tie die out of watercolor paper.  I used the small size tag because I have the small size pumpkin blueprint stamp so I just scaled the whole thing down. 

DSC 0008

I found a background stamp to use, it is the one I use a lot when needing a large background stamp.  I have very few background stamps this large.  This is a stamp along with most of my rubber stamps that I unmounted and didn't write on them who the manufacturer was.  So I used this unknown stamp and white picket fence distress paint to make the background on the small tag.  I rolled the paint onto the stamp with a small Ranger brayer.

DSC 0010

I used ground espresso, hickory smoke, and black soot spray distress stain on the background over the picket fence distress paint. 

DSC 0011

I then inked the outer edges of the tag with ground espresso ink using the ink tool.

DSC 0013

I then took the small pumpkin blueprint stamp and stamped the tag once using the entire stamp and stamped twice on white watercolor paper.

DSC 0014

I then took some Heidi Swapp gold foil and used the Ranger glue stick around the edges to get the distress gold foil look.  I then dried the glue so the foil would stay where it belongs.

DSC 0016

I then cut out the pumpkins and painted them using distress markers.  I used that embossing tool to make the middles on the pumpkin stand out.  I then used foam to stick the pumpkin on the tag, and used more foam to stick the stem onto the pumpkin and tag.  I used the Tim Holtz spritzing tool with black soot distress marker to make the black dots on the pumpkin.

DSC 0017

DSC 0018

I used the alphanumeric dies to cut fall out of cork.  The tag was not big enough to use autumn and the cork was not thick enough to tape the dies, cut, and pull the tape off the cork without the cork breaking up, so I settled for Fall.  I inked the cork edges with ground espresso.

DSC 0019

I cut some linen ribbon and inked it with ground espresso.  Then I dug out an arrow and tied some jute around it.  I also put a small enamel heart on the right side of the Fall word.

DSC 0020

DSC 0021

And here is the finished tag in all it's glory.  Thank you for looking.

Please join Artsy Inkers message board to make a comment.

Login Form